Monday, November 18, 2013

The Blacklist- Part I

Its been awhile since I have had a chance to post something. And not for lack of work.. I did two movies earlier this year (and won't be able to talk about until they premier). And currently, since July, I have been the makeup department head on NBCs new show, The Blacklist.

Since we have already aired a bunch of episodes I can finally talk a little bit about some of the effects. Firstly, I want to state that myself and Jeremy Selenfriend (of Monsters In My Closet) fabricate all the effects, barring an odd or end and running the actual silicone encapsulated pieces.

We take care of everything from scars and scratches to burned dummies and fake hands.

Ill start from the first episode and work in chronological order, over a few separate posts. I did NOT work on the pilot. The effects on the pilot episode were handled by Louie Zakarian and the makeup department head was Amy Tagliamonti.

Episode 102: The Freelancer

For this episode we had a few ritualist scars done as prosaide transfers and a fake neck for an emergency tracheotomy on Isabella Rosselinis character.
There was also a ton of out of kit trauma makeups and dirt, and a really juicy compound fracture.

Tom Keen "healing" carried over from the pilot episode.

Prosiade Transfer branding scar.

Prosaide transfer keloid scar.

Since Isabella was unavailable for the life cast we used a neck double. I was able to cast Smooth On Body Double around her entire neck and do the plaster bandage mother mold in two parts. When it came time to remove the life cast we were able to slip the body double mold over our models head, without cutting the mold and leaving a seam.

Mold release was applied to the inside of the life cast and a few thin layers of silicone were painted in. Each layer was tinted in varying colors to intrinsically paint the neck as close as possible to Isabellas color. Next, it was filled with a two part expanding foam.

Here is Isabella's neck next to our prop neck. Jeremy painted a few extrinsic layers of color using skin illustrator inks and an air brush.

This is a screen grab of the neck in position.

Our stand in is miming the action.

Finally, here is the pen going in. Ewwwww.

Additionally we had to make a small prosthetic that would hold the pen to look as if it was in Isabella's neck. 

The pen was cut down to the proper length and an rare earth magnet was epoxied into the hollow barrel of the pen. Then, using the same life cast the prop neck was made in, a few coats of Baldiez was painted onto the throat area. Another rare earth magnet was placed onto the Baldiez and a few more layers were added. Carefully the Baldiez was peeled up with the magnet in the middle. 

Prior to attaching this quick prosthetic, the pen was attached by magnet to the piece. Then a little glue was painted on the back of the Baldiez piece and the edges blended away leaving the pen sticking straight up. 

Episode 103: Wujing

We definitely got a little break with this episode as far as things to fabricate. There were some really great trauma makeups by Jeremy. Our big build this episode was a severed hand. (Which you can see right at the beginning of the episode. You'll have to watch the whole thing to see some good bloody noses.)


Since we fabricate everything mostly on set, here is Jeremy casting his own hand to use as the prop. We used body double and plaster bandages and made the final hand out of Smooth On Dragon Skin.

Episode 104: The Stewmaker

This was our first big character makeup on the show. Our villain liquifies its victims in acid.. hence, the moniker, Stewmaker. He is hairless as to not leave any trace of himself at his crime scenes and is covered with acid burns from his own nasty brews. 

Jeremy and I sculpted about 30 different scars and made molds out of GI 1000. All the pieces were run as prosaide transfers. (We also made 2D tattoos, but ended up not liking them as much as hand painting them on, which we did with PPI Skin Illustrators). Tom Denier Jr. was on hand to help us apply the pieces. In the end we got the makeup down to about an hour.


This is the water color painting for the 2D Tattoos we never used.

This is one of the series of scars we sculpted.


Here are the scar transfers after they have been molded and painted sparingly with Skin Illustrator inks.


This is a screen shot of the finished makeup... scary!


Another screen shot... just as scary!

Here is a close up of an arm.


I should also mention that we had to make a fake arm (to match an actor) that gets boiled in acid. We made a silicone arm that we cut pockets into randomly. In these pockets special effects added some sort of magic powder that boiled and bubbled when it hit the water. Pretty cool.


Here is the arm fresh out of the mold.

Since we had to match the arm to the actor each hair was punched in individually. The hair is crepe wool.

Our leading lady gets pretty beat up too. The dirt is skin illustrator inks from the brow palette and the blood is a combination of fresh scab and fleet street blood and blood paste, my favorites!


Stay tuned.... I will be posting a few more entries over the next few weeks with more fx from The Blacklist. For now, you can follow me on instagram at @elleirat  I try to post makeup-y pictures every day with the odd art project thrown in there for good measure.


Monday, August 19, 2013

Likeness Sculpture Prop Head


I just finished (a few months ago) one of the most challenging and fun prop jobs ever. I was asked to

replicate the lead actors head with bullet hole exit wound trauma.

 Normally, I would have life cast the actor and done a re sculpt, but since the actor is

Swedish, upon wrapping principal photography, he went back home. Leaving me with

the task of sculpting his likeness using just a few stills as reference.

As always, I was working within a time constraint. I thought it would be faster to sculpt in

WED clay. After a day of sculpting and a blob of mushy clay on my armature (a piece of

PVC pipe set into a PVC flange screwed to a board) I scrapped it and started over in my

stand by clay, Chavants Le Beau Touché.


The sculpture took about 14 hours. I worked on getting the features right before moving

on to the trauma area. The trauma itself is very exaggerated, as per notes from the

director. The main note was to make it gross, as there was not enough gore in the film.


After the sculpture was approved it was time to make the mold. I made a rubber and

resin and Fiberglas brush up two part mold. I used Dragon Skin 10 Fast as the mold

rubber. I do not recommend this for mold making, but since I had a day to make the

mold I needed something that would cure really fast. I tinted the rubber with silc-pig

pigments by Smooth-On. For the resin, I used Aqua Resin, a material I haven't used in a

long time. I forgot how easy it is to use. I reinforced it with chopped Fiberglas and tinted

it with Tints-All pigment.

I tint each side of the rubber and each side of the mother mold in different colors as it

really helps in the demolding process.  You can see each half of the rubber and resin

more clearly.


The mold was cleaned out with some soap and water and dried. As a mold release I

used Vaseline. After brushing a thin layer in the mold, I used a heat gun to melt away

any brush marks.


The mold strapped together and ready for casting.

I used Dragon Skin 10 Fast for the casting as well.  I was able to pre tint my Part B of

the rubber with Fuse FX intrinsic pigment.  Working in small batches I built up a 3/4 inch

skin inside the mold. A heat gun really helps to speed up the curing time. After each

batch of silicone I was able to rest the mold in a tub and force cured the silicone with

high heat.

After a sufficient thickness of silicone was built up, the rest of the cast was filled with two

part foam. For this I used Flex Foam V by Smooth-On. As the foam was expanding, I

held a piece of 2" PVC pipe in the mold so I would be able to place the rubber head  in

the armature flange.


The head demolded easily and was placed in the armature stand. I cut away any

silicone flashing and filled my seams with a little 3rd degree silicone mixed with pigment.


Fuse Fx pigments and skin Illustator paint splatter are my go to coloring system . Then

a dusting of baby powder to mattify the finish.


The hair used was human hair in two colors. I started with the eyelashes and eyebrows.

Then on to the bulk of the head. I used a larger hair punching needs for the back of the

head where the hair could be thicker and a finer needle for the top and sides. I bought

some amazing punch needles at www.makeup-fx.com    


The beard was done with crepe wool in the same fashion. After punching the hair, I

used a regular beard trimmer to shave the hair. I felt it was too sparse and went back

and added more hair. Again, shaving with a clipper.


As for the hair styling, I brought the head to my friend, colleague and amazing hairstylist

Monet Moon, www.monetmoon.com She cut and styled and added the finishing touches

to the hair.


On set blood and gore was added to the trauma area.


Thursday, May 16, 2013

Heart


I have been very busy working on a few really exciting films. Unfortunately, I won't be able to share the gorey bits until the films come out.. It will be worth the wait, I promise.

In the meantime, I can share a prop and prosthetic that I just made for my friend Alex for a music video. As soon as the video is finished I will post a link.

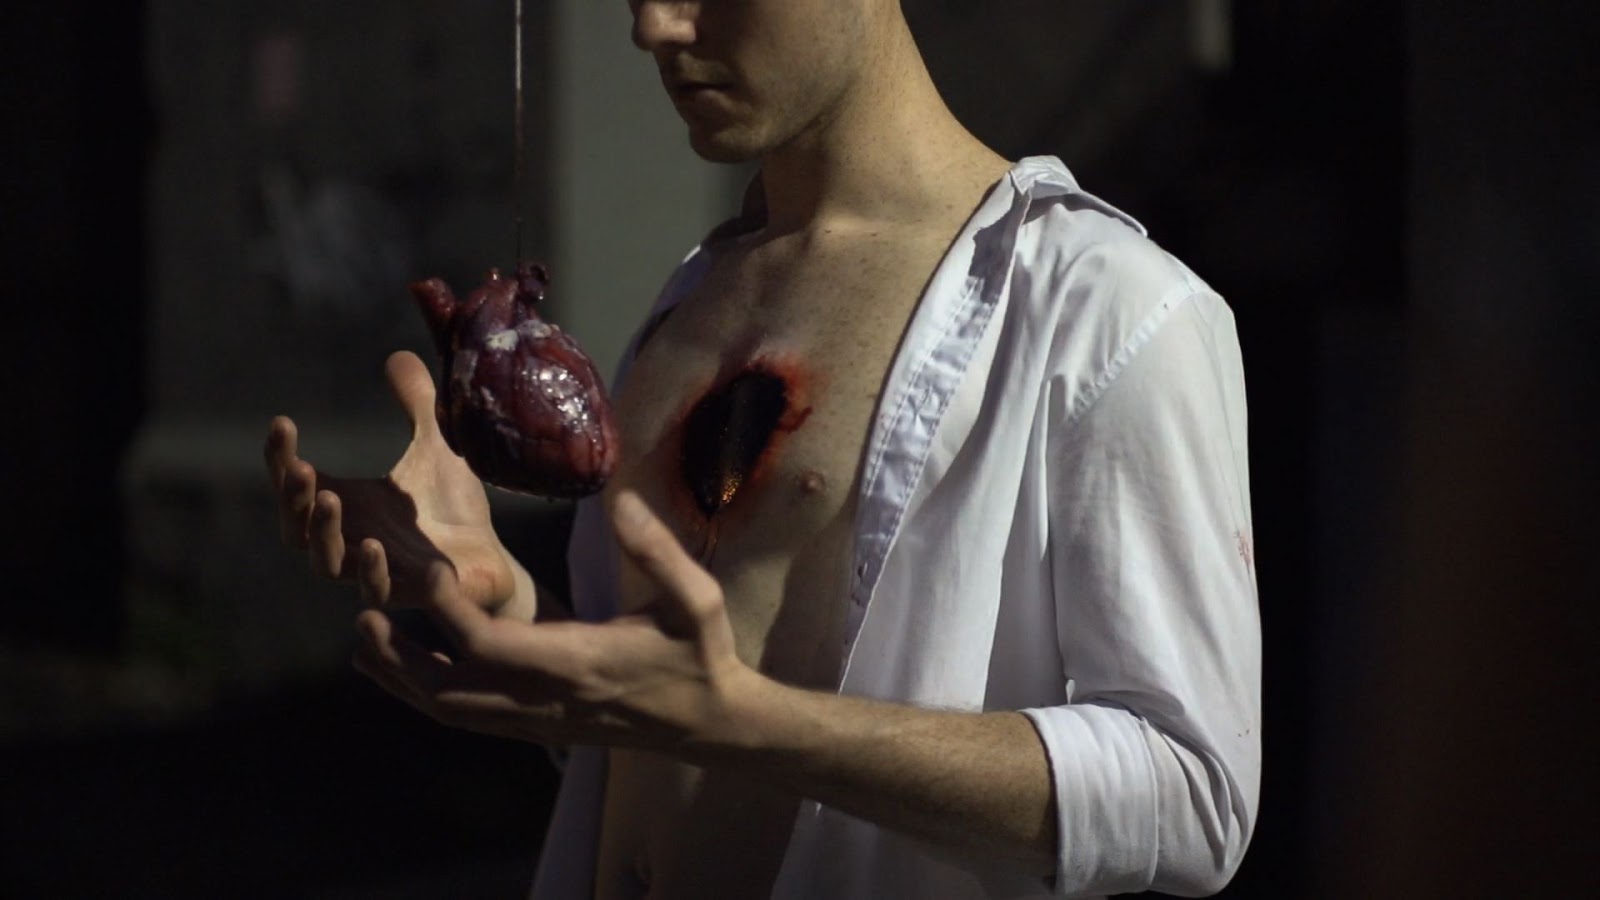
Alex asked me to make him a realistic heart and a prosthetic. The prosthetic would be placed on the chest to create the illusion of a hole that the heart came out of.


For the prosthetic, we talked about shooting it a few ways. Sometimes good old fashioned special effects and fancy new technology work perfectly together..and this seemed like the perfect effect to blend the two. I had suggested making a hole appliance, then, using green screen makeup to paint the inside if the hole. In post, it could be made to look really deep.

Unfortunately, the budget and time constraint did not allow for this and the inside of the prosthetic was painted black with goopy blood applied on top. As I was not available for the shoot, my good friend Mia Bauman was responsible for the amazing application and painting of the prosthetic. 


The appliance itself was a prosaide transfer. I tinted the creamed prosaide before casting so minimal painting would have to be done on site. 

Using some scrap wood around the shop I built a quick little armature to start sculpting the heart on. Where the dowel was would ultimately become the gate of the mold where I would pour the casting material in.

Having a bunch of my favorite Chavants Le Beau Touché clay recycled from previous sculptures I started sculpting. The sculpture took about five or six hours from start to finish. I used a print out from a google image search as a reference. One of my favorite sculpting tools is a little loop tool from Kemper I purchased in Atlanta last year. It was amazing for the detail in the heart. 

This project was the..."what materials do I have lying around the shop...I'll use the leftovers from the past many projects". Which is great for cleaning out the studio. 


For the mold, I built up my dividing wall with WED clay and brushed on a few layers of Dragon Skin 10 Fast (I generally don't use this for molds, but since this was already at the shop, I used what I had on hand). My last layer I thickened with Thivex, a silicone thickening agent by Smooth-On.

I used Aqua Resin and chopped fiberglass for the mother mold. I don't usually ignore mixing instructions when it comes to materials, but I always mix my Aqua Resin really thick for my molds. It is a two part compound, a liquid and a powder that mixes similarly to plaster. I buy double the amount of the powder component when making molds (it's also a great casting material too).


After the first half of the mold cured over night, I carefully removed the WED clay wall and cleaned any water clay residue from the sculpture. For a release, I used Vaseline on the rubber and Sonite Wax on the resin.

I applied the second side rubber and resin just as I did the first. After an overnight cure I trimmed the edge of the resin all the way around on the band saw. 

I had some weird inhibition during the cure for the mold rubber. I'm not sure if it was from using old material or recycled clay, but the inside on one half of the mold remained a little tacky. Regardless, I was going to attempt casting a rubber heart. 

After cleaning the mold with 99% alcohol, I used a generous amount of Vaseline to the inside of the mold as a release.

I pre tinted some Dragon Skin 10 Fast with Silc Pig pigment and hoped for the best.


After a few hours I demolded a perfectly good heart! (I will be reusing the mold one last time, to make a master plastic heart to make another mold off of).

The heart was cleaned with soap and water and dried. I used Silc Pig and Fuse FX pigments for the painting. I think the fatty bits are my favorite. 


From here, the art department took over......


Saturday, January 19, 2013

The Brass Teapot


The Brass Teapot trailer has finally arrived! This was a wonderful film to work on as the makeup department head. Not only was I able to make our lead (Juno Temple) beautiful throughout the film, but also provided the special effects makeup as well.  

The effects were numerous throughout, ranging from hand laid hair (Hasidic Jews), to grotesque black eyes. I hid a few prosaide transfers and silicone transfers in there, along with custom tattoo work, and lots of cuts, burns and bruising. 

Enjoy the trailer and see the film when it hits the theaters.
http://trailers.apple.com/trailers/magnolia/thebrassteapot/