Sunday, January 13, 2013

Solarian 17


Its not often I get asked to create out-of-this-world creatures. Recently though, I had the opportunity to fabricate some retro elephantine-like aliens. They were one part elephant one part human and one part Max Rebo from Star Wars. I made two heads (that had added animatronic eyebrows and moving mouths) and two sets of creature gloves.


This was the concept art created by my client, Daniel Porter.

The sculpts were done over an armature head that I purchased from CFX. I then built a wire and cardboard armature over the head and started adding clay. I took a life cast of the hands and arms from one of the actors and used that as my armature for the gloves. For the ears, I cut a piece of plywood with a scroll saw in the general ear shape and screwed it up right on another piece of plywood as a stand.

The armature was wrapped in saran wrap for easy cleanup.


I did the life cast in Body Double and plaster bandages. Then I hand roto-cast the positive in Shell Shock urethane (in a few layers), and filled it with foam. Stands were made using scrap wood and some pvc plumbing fittings from the hardware store.

The life casts

The life casts ready for sculpting.


Even though I had over a month to create the aliens, I wanted to use a softer clay that would help speed up the sculpting process but still hold detail. Chavant Le Beau Touche was my choice. To sculpt the wrinkles I placed a piece of visquine onto the clay then used a wooden sculpting tool to press each wrinkle in though the plastic sheet. This gives a nice soft edge to each wrinkle. By varying the edge of the tool and the thickness of the plastic I had a lot of control over the size of the wrinkles.

Glove sculpts.

Alien hand detail. I used a latex texture stamp for the finger nails.


Half domes were purchased from Canal Plastics for the eyes. I used the forms to sculpt around and left them in during the molding process. After de-molding, they were cleaned up to be used for the mask eyes.
The very beginning of the sculpture.

Final sculpt front

Final sculpt profile


The glove molds were made in two parts using Rebound 25 platinum silicone (the first coat in body double) and Ultra Cal plaster and the ears in a two part Shell Shock mold. The mold for the head was done in four parts, the head in two and the trunk in two using Shell Shock Fast Set urethane. As a release agent, Palmolive dish soap and water (mixed about 50/50) was bushed onto the clay before the urethane was applied. The head was untraditionally split down the middle and the trunk was split top and bottom. WED clay was used to make the dividing walls for the urethane. Bolt holes were drilled prior to demolding.

The first coat of silicone

The head mold, with un molded trunk portion

The ear, ready for the second half of the mold


Once demolded, the clay was cleaned out. Next, an inner shell had to be created as a support for the silicone mask and animatronics. To do this each side of the head was packed with a thin layer of WED clay, about 1/4" or so. the halves were bolted together and the inside seam was sealed with a little more clay and the hole where the trunk goes was filled with clay as well. Then, Shell Shock fast set was bushed inside the mold. About 4 coats were needed for a sturdy shell (though it was weak in a few spots and could have used a few more coats. Later on, fiberglas was tapped into the shell for extra support). After the urethane cured the mold shells were taken apart, the clay cleaned out and the shell cleaned up.

WED clay lining the mold

A few coats of Shell Shock

The mold and the inner shell


To cast the gloves, I brushed in a thin layer of silicone to both mold halves. I used Dragon Skin 10 Fast tinted with artist oil paints. After the first layer cured, a thick layer of silicone was spatulated in. To thicken the silicone to a peanut butter consistency a few drops of Thi-Vex by Smooth-on was added to the tinted silicone. I was able to place the silicone inside each mold half, bringing the silicone past the mold edge, then, the two halves were placed together. The extra material at the edges squished together to seal the halves to each other. Once demolded, there were a few areas at the seam edge with a small holes that was easily patched with some thickened silicone.

Right out of the mold with flashing un trimmed


Casting the head was a bit more complicated. First, the trunk was cast by brushing tinted silicone into the mold. After a few layers of silicone the trunk was filled with Flex Foam III, a two part expanding foam. I was careful to not let the foam expand past the seam edge of the trunk.

Silicone skinned in trunk mold


Next, both halves of the head mold were bolted together around the urethane shell and the trunk bolted on as well. The space between the mold and the shell is filled with silicone. I ended up casting each head in a different way. For the first head, injection holes were drilled at the top of the mold and bleeder holes made along the mold from top to bottom. This was incredibly laborious and took a lot of strength (by Rob DeMaio) to inject the silicone little by little using 60cc syringes.

The second head went much faster. I turned the mold upside down and supported it in a cardboard box. I then used some clay and a plastic cup with a hole at the bottom to make a sort of funnel at the bottom (which is now the top) of the mold. The clay was used to direct the silicone right into a space between the shell and the mold.

Filling the mold with tinted silicone


I want to add that I brushed in a few layers of palmolive soap and water to each side of the head mold before the casting process. To demold the heads, the entire mold was submerged in a large sink of water. The soap was able to wash away making it easier to get the cast heads out.

The heads, demolded, flashing cut away


Each pair of ears were cast in different materials. For the first pair I brushed a layer of silicone into each mold half. Once cured (or almost cured) the mold halves were strapped together. More silicone was poured inside and the mold was rotated so the new silicone could fill in the seam. Then Flex Foam V was used to fill the rest of the ear.
The second pair of ears were cast in tinted Soma Foama. An expanding two part platinum silicone by Smooth On. For tinting the rubber I used SilcPig pigments. Interestingly these foam ears were much heavier then the first pair.

The ears filling with two part foam

The Soma Foama ears


To paint the head, gloves and ears, layers of tinted silicone was applied. I mixed up small, and not so small batches of tinted silicone (using artist oils and Dragon Skin 10 Fast) and "painted" it on with my fingers, (wearing rubber gloves, safety first!). Many layers later they seemed to come to life.

About half way through the painting

The first coat of paint

Paint detail


Lastly, the eyebrows had to be fabricated. I sculpted them in clay, made a one part plate mold using Rebound 25 and cast them in Smooth Cast 300, a white, two part plastic resin. These were painted using nail polish and finished with a little loose wool for some awesomely fluffy brows.

Finding the correct placement for the brows


As soon as the painting was done the heads were taken to my friend Rob DeMaio's shop out in New Jersey to get "life" put in them. Rob added more fiberglass to support the inner shell and added a cable pull to operate the movement of the mouth and servos to move the eyebrows. He also installed brackets  in order to attach the eyes from the inside.

The guts!


To get the detail in the eyes, I printed an eye image onto transparency paper. They were attached using spray adhesive. Then a piece of tracing paper/vellum was cut to the size and shape of the eye and attached to the transparency using the spray adhesive, sandwiching the print out. This gave the option of illuminating the eye from behind with LED lights. The tracing paper was able to diffuse the light and act as a screen as to not see the actors head behind the eye.


Once the heads returned to my studio I attached the ears. I mixed up some more Dragon Skin 10 Fast with some paint and Thi-Vex and "glued" the ears to the sides of the head. More silicone was added and free hand sculpted in order to have a smooth transition from ear to head.

Attaching the ears

Ear detail


Rob, of course, was the first to try it on. Then off to set!

Rob trying on the mask

On set, fitting the mask and gloves

In costume, ready for action.


Friday, December 7, 2012

Shark Attack

I recently flew down to Florida to work on an Outdoor Channel show called "Lived to Tell". True stories about amazing survivals. The first a story of a man lost in the Everglades for four days then two shark attacks.

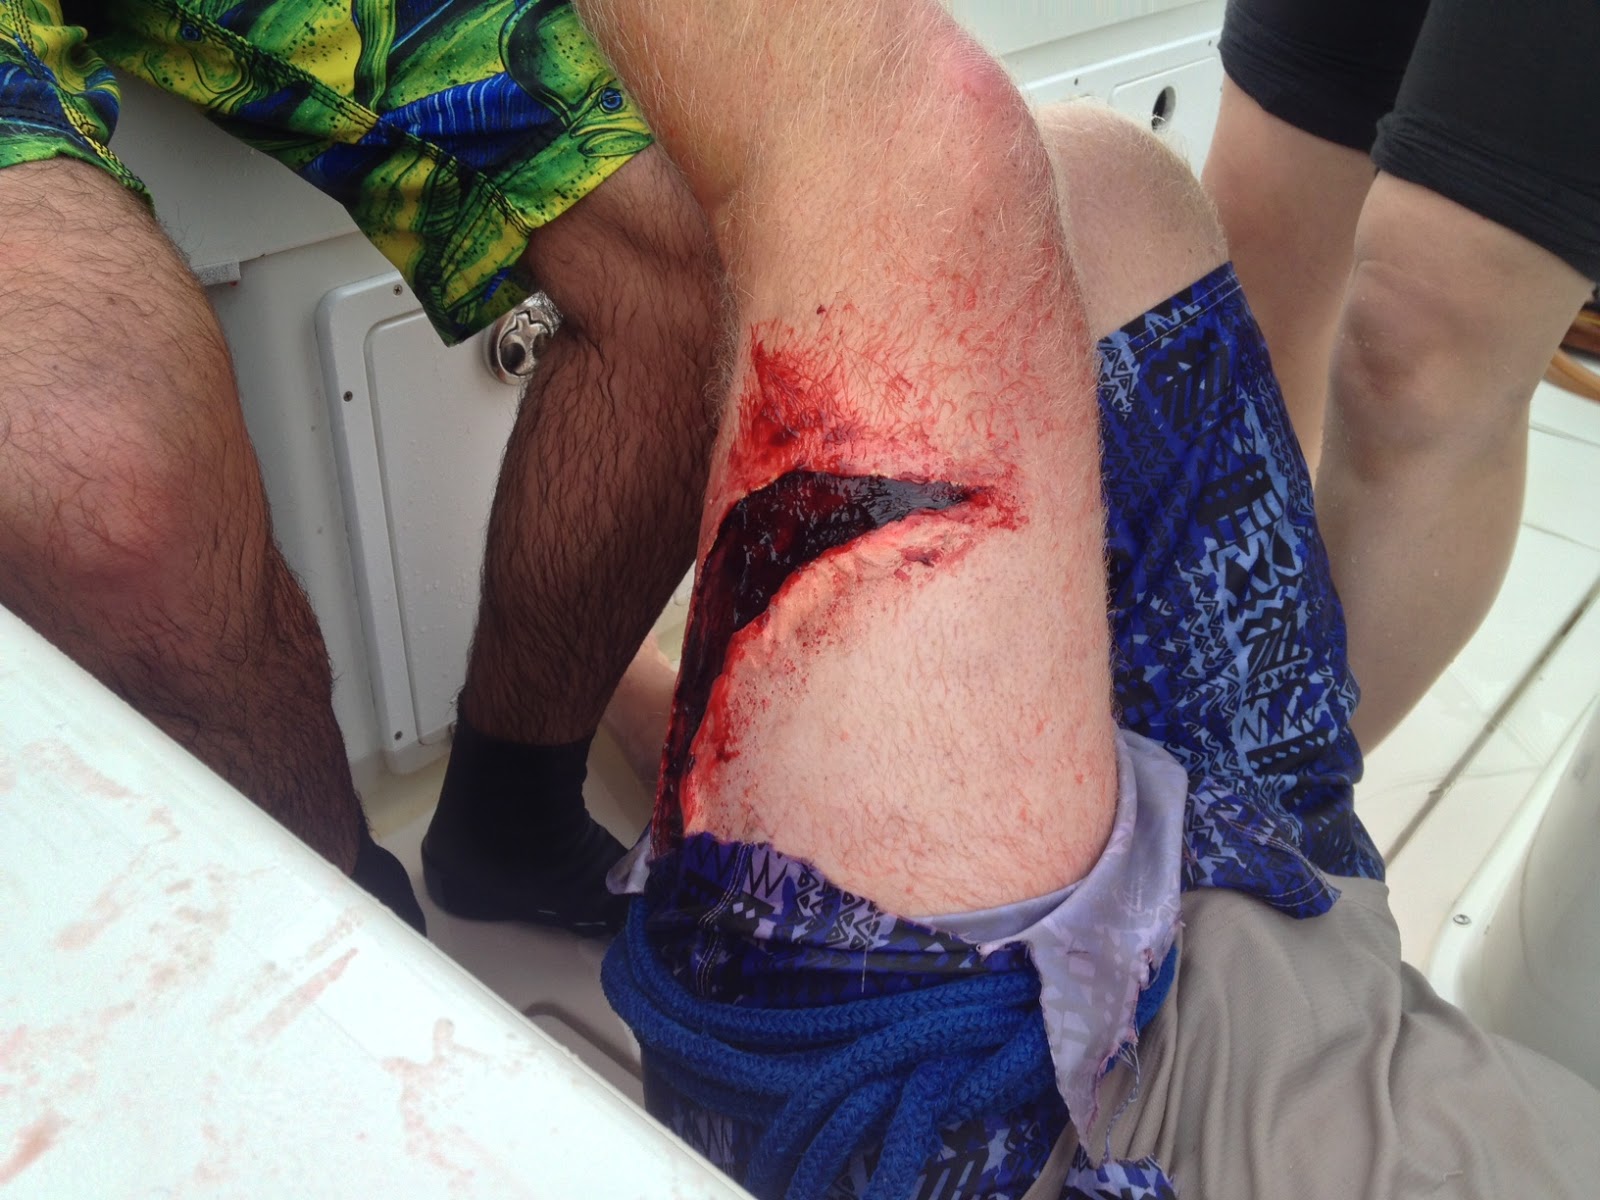
Most of the makeups were out of kit, but there were a few pros-aide transfer pieces I sculpted for each of the shark attack stories. In one story, a boy tries to fight the shark off by punching it in the face to only severely cut his hands on the sharp teeth. The other a large shark bite for the upper thigh, where the victim was bit.

For both shark stories the makeups and prosthetics had to withstand the long days and ocean water. Happily, all the prosthetics and makeup lasted through hours in the ocean.


Our Everglades survivor. Makeup done with theatrical dirt, tattoo inks and Fleet Street blood.


Pros-aide transfer gashes on hands. Painted with tattoo inks and Fleet Street blood.


The victim after the attack, dragged to shore. We used a marine friendly blood made of fruit punch concentrate, imitation maple syrup and karo syrup. Delicious!


The fiberglass shark.


Early morning application on our picture boat. This is a large pros-aide transfer appliance. Our actor playing the victim is the actual real life person who was attacked by a bull shark. Not only did the appliance need to look like the bite but it had to cover the huge scar on our heroes thigh.


Attack!! Shark and shark "wranglers".


The bite.


The bite with more blood. I filled the "gash" in with Ben Nye thick blood and Fleet Street drying blood in Fresh Blood. This seemed to be the best combination of bloods to stay on in our very wet environment. We of course added tons of our homemade blood as well.


Wednesday, October 31, 2012

The Studio

Since moving into our (my sister and my) fantastic new studio space there has not been a dull moment. Not only can I take on larger fabrication projects, but also many more projects at once. Here are a few things that have been happening this past month.
Brow prosthetic for a Prometheus Engineer for Comic Con NYC

Final Engineer makeup

"Sloth" from the Goonies prosthetic for Halloween

Sculpt and mold for prosaide transfers
More on this project soon!

Sinister


Last October I had the pleasure of Department Heading the film Sinister starring Ethan Hawke. Here are a few stills from the film. 


The wonderful folks over at Todd Master FX handled most of the big makeup effects. I did get my hands bloody a few times. Here I used Fleet Street bloods and Mehron bloods with a little Skin Illustrator as the base color.

Monday, October 29, 2012

Crash Test Dummy

I have been meaning to post this for a while as this fabrication happened back in September. I was asked to remake and alter a crash test dummy head and hands to resemble those from a vintage 1950's dummy. The client was interested in the look of the vintage dummy but needed something that would withstand extreme impact. 

There were many factors to consider other than just a cosmetic remake of a head and hands. First of all the parts that I would be making needed to be able to attach to a rented crash test dummy body. Also, the dummy would be impacting at 90 mph and the parts would need to stay together during the impact. In addition I needed to change the skin color of the dummy. The new ones were to be dark brown red instead of the more yellow caucasian flesh color of the original vintage dummy.

I needed strong and durable materials that I would be able to tint.


To start, I made a "life cast" of the original dummy head. Then I made a cast in clay using Chavant NSP, (melted and brushed in and reinforced with burlap). I was then able to resculpt the mouth in an open position to match that of the vintage dummy.


A new mold of the head was then made out of silicone rubber and Plasti Paste. To cast the head I decided to use Task 16, a urethane rubber by Smooth-On.

The Task 16 was tinted and roto-cast by hand inside the head to a thickness of about a half an inch. I then used Flex Foam V to fill the rest of the head making sure that the foam didn't fill the neck. The foam added structural support without adding too much weight to the final product. I then filled the neck area with a little more Task 16 and let that cure.


The original head attached to the dummy body via a bolted on metal bracket. I needed to make sure that the new head would be able to attach in the same way.


I drilled out large holes to inset three standoffs--fittings that thread from the inside (purchased from mc master carr) into the cast head. Using a cast of the bracket (that I had molded earlier and cast in Smooth Cast 300) I attached the standoffs with machine screws and placed them in the drilled holes. I filled the holes with a little Task and once that cured I took the bracket off and added more Task around the top of the fittings.


The hands were much simpler because I did not have to alter them. They just needed to match the skin tone of the newly cast head. Silicone and Plasti Paste two part molds were made of each hand. They were then cast in solid Task 16 rubber tinted with with same Flesh colored So Strong pigment.


Once the Task cured rubber I had to cut away and drill out of the wrist area so it could attach with the existing hardware of the crash test dummy.


After everything had been cast my client decided that it needed ears (after my sculpture, sans ears was approved. The 1950's version had ears, the new versions do not.) So I did a quick sculpt of simple ears, molded them with body double, and cast in them in tinted Task 16. The ears attached to the head with Task 16.


Next, the head just needed a little paint to match the vintage version. Pupils, eyebrows and some hair.


Just a few days later the dummy was shot in black and white with a high speed camera, and looked (and worked) perfectly.


Wednesday, October 3, 2012

The Campaign for Wool, Bryant Park - New Business Ventures


September was a busy month for Amelia and I. We were asked to design and build a few key elements for the Campaign for Wool event on September 27th in Bryant Park. There were many components to this event. We were responsible for creating a fence to house 30 sheep for the day, transforming the fountain into a wooly sculpture, and wrapping 13 trees in brightly colored wool. 


From budget approval to final product we had just under three weeks to get complete and install our work. We were able to move into a new studio just in time to get started. Spark Workshop Brooklyn is now home to our new joint ventures and individual businesses.  

••••

The fence was collaboratively conceived. We were asked to design the fence using clear plexiglass panels. The concept was to put the sheep on display as opposed to a farm or petting zoo. 

We had the added challenge of building the fence so that it would be easily constructed on site within a limited timeframe. We also wanted the fence to break down and pack up for use on other sites. 

A final challenge was that due to park regulations, we were unable to put anything into the ground. 

We came up with a modular design that used dados, grooves, posts, and concrete blocks to create a secure and stable structure. 

We hired local woodworker, Iris Lasson, to fabricate the wood posts and railings

We cast over forty concrete bases in reusable molds 


The post cap became a key structural element 


We were able to take more creative control with the fountain. Our concept was to highlight the beautiful fountain by making wool fiber seem like water. 


We built wooden structures out of plywood and then wrapped them in wool fabric so that we were easily able to attach wool fiber. 


Here are images of the fountain installation:


The event was one day only. We came in the evening to take everything down and pack up what needed to be shipped for future events. 

Check out this link (one of many) to read about the event: